Getting Started
Let’s get started with an example: We are going to create an MD5 hash calculator app that uses one of the most popular C++ libraries: Poco.
We’ll use CMake as build system in this case but keep in mind that Conan works with any build system and is not limited to using CMake.
Make sure you are running the latest Conan version. Read the Conan update section get more information.
An MD5 hash calculator using the Poco Libraries
Note
The source files to recreate this project are available in the example repository in GitHub. You can skip the manual creation of the folder and sources with this command:
$ git clone https://github.com/conan-io/examples.git && cd examples/libraries/poco/md5
Create the following source file inside a folder. This will be the source file of our application:
md5.cpp#include "Poco/MD5Engine.h" #include "Poco/DigestStream.h" #include <iostream> int main(int argc, char** argv) { Poco::MD5Engine md5; Poco::DigestOutputStream ds(md5); ds << "abcdefghijklmnopqrstuvwxyz"; ds.close(); std::cout << Poco::DigestEngine::digestToHex(md5.digest()) << std::endl; return 0; }
We know that our application relies on the Poco libraries. Let’s look for it in the Conan Center remote:
$ conan search poco --remote=conan-center
Existing package recipes:

poco/1.8.1
poco/1.9.3
poco/1.9.4
Conan remotes must be specified in search. It will otherwise only search local cache.
We got some interesting references for Poco. Let’s inspect the metadata of the 1.9.4 version:
$ conan inspect poco/1.9.4
name: poco
version: 1.9.4
url: https://github.com/conan-io/conan-center-index
homepage: https://pocoproject.org
license: BSL-1.0
author: None
description: Modern, powerful open source C++ class libraries for building network- and internet-based applications that run on desktop, server, mobile and embedded systems.
topics: ('conan', 'poco', 'building', 'networking', 'server', 'mobile', 'embedded')
generators: cmake
exports: None
exports_sources: CMakeLists.txt
short_paths: False
apply_env: True
build_policy: None
revision_mode: hash
settings: ('os', 'arch', 'compiler', 'build_type')
options:
    cxx_14: [True, False]
    enable_apacheconnector: [True, False]
    enable_cppparser: [True, False]
    enable_crypto: [True, False]
    [...]
default_options:
    cxx_14: False
    enable_apacheconnector: False
    enable_cppparser: False
    enable_crypto: True
    [...]
Ok, it looks like this dependency could work with our hash calculator app. We should indicate which are the requirements and the generator for our build system. Let’s create a conanfile.txt inside our project’s folder with the following content:
conanfile.txt[requires] poco/1.9.4 [generators] cmake
In this example we are using CMake to build the project, which is why the
cmakegenerator is specified. This generator creates a conanbuildinfo.cmake file that defines CMake variables including paths and library names that can be used in our build. Read more about Generators.Next step: We are going to install the required dependencies and generate the information for the build system:
Important
If you are using GCC compiler >= 5.1, Conan will set the
compiler.libcxxto the old ABI for backwards compatibility. You can change this with the following commands:$ conan profile new default --detect # Generates default profile detecting GCC and sets old ABI $ conan profile update settings.compiler.libcxx=libstdc++11 default # Sets libcxx to C++11 ABI
You will find more information in How to manage the GCC >= 5 ABI.
$ mkdir build && cd build
$ conan install ..
...
Requirements
    openssl/1.0.2t from 'conan-center' - Downloaded
    poco/1.9.4 from 'conan-center' - Downloaded
    zlib/1.2.11 from 'conan-center' - Downloaded
Packages
    openssl/1.0.2t:eb50d18a5a5d59bd0c332464a4c348ab65e353bf - Download
    poco/1.9.4:645aaff0a79e6036c77803601e44677556109dd9 - Download
    zlib/1.2.11:f74366f76f700cc6e991285892ad7a23c30e6d47 - Download

zlib/1.2.11: Retrieving package f74366f76f700cc6e991285892ad7a23c30e6d47 from remote 'conan-center'
Downloading conanmanifest.txt completed [0.25k]
Downloading conaninfo.txt completed [0.44k]
Downloading conan_package.tgz completed [83.15k]
Decompressing conan_package.tgz completed [0.00k]
zlib/1.2.11: Package installed f74366f76f700cc6e991285892ad7a23c30e6d47
zlib/1.2.11: Downloaded package revision 0
openssl/1.0.2t: Retrieving package eb50d18a5a5d59bd0c332464a4c348ab65e353bf from remote 'conan-center'
Downloading conanmanifest.txt completed [4.92k]
Downloading conaninfo.txt completed [1.28k]
Downloading conan_package.tgz completed [3048.81k]
Decompressing conan_package.tgz completed [0.00k]
openssl/1.0.2t: Package installed eb50d18a5a5d59bd0c332464a4c348ab65e353bf
openssl/1.0.2t: Downloaded package revision 0
poco/1.9.4: Retrieving package 645aaff0a79e6036c77803601e44677556109dd9 from remote 'conan-center'
Downloading conanmanifest.txt completed [48.75k]
Downloading conaninfo.txt completed [2.44k]
Downloading conan_package.tgz completed [5128.39k]
Decompressing conan_package.tgz completed [0.00k]
poco/1.9.4: Package installed 645aaff0a79e6036c77803601e44677556109dd9
poco/1.9.4: Downloaded package revision 0
conanfile.txt: Generator cmake created conanbuildinfo.cmake
conanfile.txt: Generator txt created conanbuildinfo.txt
conanfile.txt: Generated conaninfo.txt
conanfile.txt: Generated graphinfo
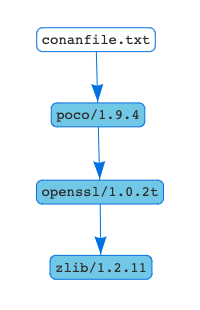
Conan installed our Poco dependency but also the transitive dependencies for it: OpenSSL and zlib. It has also generated a conanbuildinfo.cmake file for our build system.
Now let’s create our build file. To inject the Conan information, include the generated conanbuildinfo.cmake file like this:
CMakeLists.txtcmake_minimum_required(VERSION 2.8.12) project(MD5Encrypter) add_definitions("-std=c++11") include(${CMAKE_BINARY_DIR}/conanbuildinfo.cmake) conan_basic_setup() add_executable(md5 md5.cpp) target_link_libraries(md5 ${CONAN_LIBS})
Now we are ready to build and run our Encrypter app:
(win)
$ cmake .. -G "Visual Studio 16"
$ cmake --build . --config Release

(linux, mac)
$ cmake .. -G "Unix Makefiles" -DCMAKE_BUILD_TYPE=Release
$ cmake --build .
...
[100%] Built target md5
$ ./bin/md5
c3fcd3d76192e4007dfb496cca67e13b
Installing Dependencies
The conan install command downloads the binary package required for your configuration (detected the first time you ran the command), together with other (transitively required by Poco) libraries, like OpenSSL and Zlib. It will also create the conanbuildinfo.cmake file in the current directory, in which you can see the CMake variables, and a conaninfo.txt in which the settings, requirements and optional information is saved.
Note
Conan generates a default profile with your detected settings (OS, compiler, architecture…) and that configuration is printed at the top of every conan install command. However, it is strongly recommended to review it and adjust the settings to accurately describe your system as shown in the Building with Other Configurations section.
It is very important to understand the installation process. When the conan install command runs, settings specified on the command line or taken from the defaults in <userhome>/.conan/profiles/default file are applied.

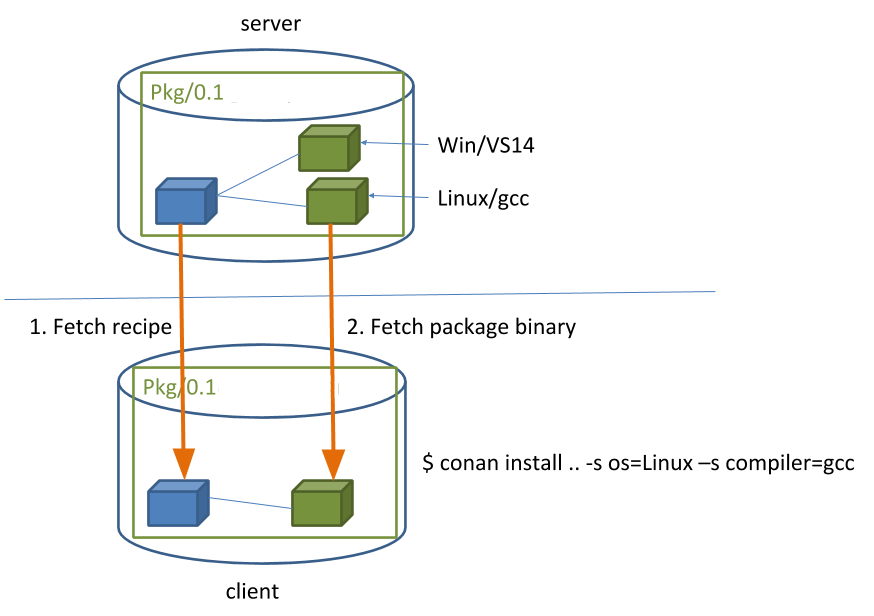
For example, the command conan install .. --settings os="Linux" --settings compiler="gcc", performs these steps:
Checks if the package recipe (for
poco/1.9.4package) exists in the local cache. If we are just starting, the cache is empty.Looks for the package recipe in the defined remotes. Conan comes with conan-center Bintray remote as the default, but can be changed.
If the recipe exists, the Conan client fetches and stores it in your local cache.
With the package recipe and the input settings (Linux, GCC), Conan looks for the corresponding binary in the local cache.
Then Conan searches the corresponding binary package in the remote and fetches it.
Finally, it generates an appropriate file for the build system specified in the
[generators]section.
There are binaries for several mainstream compilers and versions available in Conan Center repository in Bintray, such as Visual Studio 14, 15, Linux GCC 4.9 and Apple Clang 3.5… Conan will throw an error if the binary package required for specific settings doesn’t exist. You can build the binary package from sources using conan install .. --build=missing, it will succeed if your configuration is supported by the recipe. You will find more info in the Building with Other Configurations section.
Inspecting Dependencies
The retrieved packages are installed to your local user cache (typically .conan/data), and can be reused from this location for other projects. This allows to clean your current project and continue working even without network connection. To search for packages in the local cache run:
$ conan search "*"
Existing package recipes:

openssl/1.0.2t
poco/1.9.4
zlib/1.2.11
To inspect the different binary packages of a reference run:
$ conan search poco/1.9.4@
Existing packages for recipe poco/1.9.4:

Package_ID: 645aaff0a79e6036c77803601e44677556109dd9
    [options]
        cxx_14: False
        enable_apacheconnector: False
        enable_cppparser: False
        enable_crypto: True
        enable_data: True
...
The @ symbol at the end of the package name is important to search for a specific package. If you
don’t add the @, Conan will interpret the argument as a pattern search and return all the
packages that match the poco/1.9.4 pattern and may have different user and channel.
To inspect all your current project’s dependencies use the conan info command by pointing it to the location of the conanfile.txt folder:
$ conan info ..
conanfile.txt
    ID: db91af4811b080e02ebe5a626f1d256bb90d5223
    BuildID: None
    Requires:
        poco/1.9.4
openssl/1.0.2t
    ID: eb50d18a5a5d59bd0c332464a4c348ab65e353bf
    BuildID: None
    Remote: conan-center=https://api.bintray.com/conan/conan/conan-center
    URL: https://github.com/conan-io/conan-center-index
    Homepage: https://github.com/openssl/openssl
    License: OpenSSL
    Topics: conan, openssl, ssl, tls, encryption, security
    Recipe: Cache
    Binary: Cache
    Binary remote: conan-center
    Creation date: 2019-11-13 23:14:37
    Required by:
        poco/1.9.4
    Requires:
        zlib/1.2.11
poco/1.9.4
    ID: 645aaff0a79e6036c77803601e44677556109dd9
    BuildID: None
    Remote: conan-center=https://api.bintray.com/conan/conan/conan-center
    URL: https://github.com/conan-io/conan-center-index
    Homepage: https://pocoproject.org
    License: BSL-1.0
    Topics: conan, poco, building, networking, server, mobile, embedded
    Recipe: Cache
    Binary: Cache
    Binary remote: conan-center
    Creation date: 2020-01-07 17:29:24
    Required by:
        conanfile.txt
    Requires:
        openssl/1.0.2t
zlib/1.2.11
    ID: f74366f76f700cc6e991285892ad7a23c30e6d47
    BuildID: None
    Remote: conan-center=https://api.bintray.com/conan/conan/conan-center
    URL: https://github.com/conan-io/conan-center-index
    Homepage: https://zlib.net
    License: Zlib
    Recipe: Cache
    Binary: Cache
    Binary remote: conan-center
    Creation date: 2020-01-07 17:01:29
    Required by:
        openssl/1.0.2t
Or generate a graph of your dependencies using Dot or HTML formats:
$ conan info .. --graph=file.html
$ file.html # or open the file, double-click

Searching Packages
The remote repository where packages are installed from is configured by default in Conan. It is called Conan Center (configured as conan-center remote) and it is located in Bintray.
You can search packages in Conan Center using this command:
$ conan search open* --remote=conan-center
Existing package recipes:

openal/1.18.2@bincrafters/stable
openal/1.19.0@bincrafters/stable
openal/1.19.1
opencv/2.4.13.5@conan/stable
opencv/3.4.3@conan/stable
opencv/3.4.5@conan/stable
opencv/4.0.0@conan/stable
opencv/4.0.1@conan/stable
opencv/4.1.0@conan/stable
opencv/4.1.1@conan/stable
openexr/2.3.0
openexr/2.3.0@conan/stable
openexr/2.4.0
openjpeg/2.3.0@bincrafters/stable
openjpeg/2.3.1
openjpeg/2.3.1@bincrafters/stable
openssl/1.0.2s
...
As you can see, some of the libraries end with a @ symbol followed by two strings separated by a
slash. These fields are the user and channel for the Conan package, and they are
useful if you want to make specific changes and disambiguate your modified recipe from the one in the
Conan Center or any other remote.
There are additional community repositories that can be configured and used. See Bintray Repositories for more information.
Building with Other Configurations
In this example, we have built our project using the default configuration detected by Conan. This configuration is known as the default profile.
A profile needs to be available prior to running commands such as conan install. When running the command, your settings are automatically detected (compiler, architecture…) and stored as the default profile. You can edit these settings ~/.conan/profiles/default or create new profiles with your desired configuration.
For example, if we have a profile with a 32-bit GCC configuration in a profile called gcc_x86, we can run the following:
$ conan install .. --profile=gcc_x86
Tip
We strongly recommend using Profiles and managing them with conan config install.
However, the user can always override the profile settings in the conan install command using the --settings parameter. As an exercise, try building the 32-bit version of the hash calculator project like this:
$ conan install .. --settings arch=x86
The above command installs a different package, using the --settings arch=x86 instead of the one of the default profile used previously.
To use the 32-bit binaries, you will also have to change your project build:
In Windows, change the CMake invocation to
Visual Studio 14.In Linux, you have to add the
-m32flag to yourCMakeLists.txtby runningSET(CMAKE_CXX_FLAGS "${CMAKE_CXX_FLAGS} -m32"), and the same applies toCMAKE_C_FLAGS, CMAKE_SHARED_LINK_FLAGS and CMAKE_EXE_LINKER_FLAGS. This can also be done more easily, by automatically using Conan, as we’ll show later.In macOS, you need to add the definition
-DCMAKE_OSX_ARCHITECTURES=i386.
Got any doubts? Check our FAQ, write us or join the community in Cpplang Slack #conan channel!