Creating conan packages to install dev tools
One of the most useful features of Conan is to package executables like compilers or build tools and distribute them in a controlled way to the team of developers. This way Conan helps not only with the graph of dependencies of the application itself, but also with all the ecosystem needed to generate the project, making it really easy to control everything involved in the deployed application.
Those tools need to run in the working machine (the build machine) regardless of the host platform
where the generated binaries will run. If those platforms are different, we are cross building software.
In this section we cope with the general scenario where a library requires other tools to compile that are also packaged with Conan. Read this section first, and get more information specific to cross compiling in the dedicated section of the docs: Cross building.
Note
Conan v1.24 introduced a new feature to declare a full profile for the build and the host machine,
it is the preferred way to deal with this scenario. Older versions should rely on the deprecated
settings os_build and arch_build. There is a small section below about those settings, for a full
explanation read the docs matching your Conan client.
A Conan package for a tool is like any other package with an executable. Here it is a recipe for packaging
the nasm tool for building assembler:
import os
from conans import ConanFile, tools
from conans.errors import ConanInvalidConfiguration


class NasmConan(ConanFile):
    name = "nasm"
    version = "2.13.02"
    license = "BSD-2-Clause"
    url = "https://github.com/conan-io/conan-center-index"
    settings = "os", "arch"
    description="Nasm for windows. Useful as a build_require."

    def configure(self):
        if self.settings.os != "Windows":
            raise ConanInvalidConfiguration("Only windows supported for nasm")

    @property
    def nasm_folder_name(self):
        return "nasm-%s" % self.version

    def build(self):
        suffix = "win32" if self.settings.arch == "x86" else "win64"
        nasm_zip_name = "%s-%s.zip" % (self.nasm_folder_name, suffix)
        tools.download("http://www.nasm.us/pub/nasm/releasebuilds/"
                       "%s/%s/%s" % (self.version, suffix, nasm_zip_name), nasm_zip_name)
        self.output.info("Downloading nasm: "
                         "http://www.nasm.us/pub/nasm/releasebuilds"
                         "/%s/%s/%s" % (self.version, suffix, nasm_zip_name))
        tools.unzip(nasm_zip_name)
        os.unlink(nasm_zip_name)

    def package(self):
        self.copy("*", src=self.nasm_folder_name, dst="bin", keep_path=True)
        self.copy("license*", dst="", src=self.nasm_folder_name, keep_path=False, ignore_case=True)

    def package_info(self):
        self.env_info.PATH.append(os.path.join(self.package_folder, "bin"))
This recipe has nothing special: it doesn’t declare the compiler and build_type settings because it is downloading
already available binaries, and it is declaring the information for their consumers as usual in the package_info() method:
The cpp_info is not declared, so it will take its default values: the
bindirswill point to thebinfolder where thenasm.exeexecutable is packaged.In the env_info attribute, it is adding the
binfolder to thePATHenvironment variable.
This two simple declarations are enough to reuse this tool in the scenarios we are detailing below.
Using the tool packages in other recipes
Warning
This section refers to the experimental feature that is activated when using --profile:build and --profile:host
in the command-line. It is currently under development, features can be added or removed in the following versions.
These kind of tools are not usually part of the application graph itself, they are needed only to build the library, so you should usually declare them as build requirements, in the recipe itself or in a profile.
For example, there are many recipes that can take advantage of the nasm package we’ve seen above, like
flac or libx264
that are already available in ConanCenter. Those recipes will take advantage of nasm
being in the PATH to run some assembly optimizations.
 class LibX264Conan(ConanFile):
     name = "libx264"
     ...
     build_requires = "nasm/2.13.02"

     def build(self):
         ... # ``nasm.exe`` will be in the PATH here

     def package_info(self):
         self.cpp_info.libs = [...]
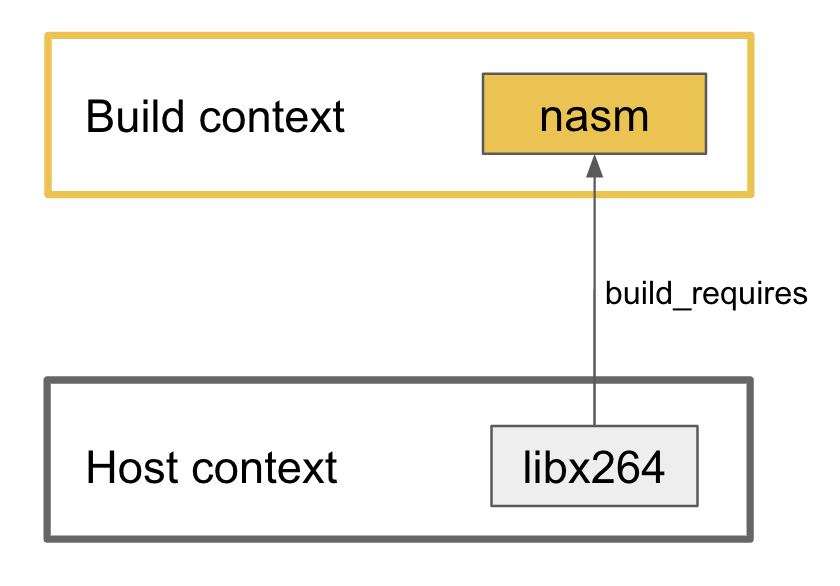
The consumer recipe needs only to declare the corresponding build_require and Conan will take care
of adding the required paths to the corresponding environment variables:
conan create path/to/libx264 --profile:build=windows --profile:host=profile_host
Here we are telling Conan to create the package for the libx264 for the host platform defined
in the profile profile_host file and to use the profile windows for all the build requirements
that are in the build context. In other words: in this example we are running a Windows machine
and we need a version of nasm compatible with this machine, so we are providing a windows profile
for the build context, and we are generating the library for the host platform which is declared
in the profile_host profile (read more about build requires context).
Using two profiles forces Conan to make this distinction between recipes in the build context and those
in the host context. It has several advantages:
Recipes for these tools are regular recipes, no need to adapt them (before 1.24 they require special settings and some package ID customization).
We provide a full profile for the
buildmachine, so Conan is able to compile those build requirements from sources if they are not already available.Conan will add to the environment not only the path to the
binfolder, but also it will populate theDYLD_LIBRARY_PATHandLD_LIBRARY_PATHvariables that are needed to find the shared libraries that tool could need during runtime.
Using the tool packages in your system
A different scenario is when you want to use in your system the binaries generated by Conan, to achieve this objective you can use the virtualrunenv generator to get your environment populated with the required variables.
For example: Working in Windows with the nasm package we’ve already defined:
Create a separate folder from your project, this folder will handle our global development environment.
$ mkdir my_cpp_environ
$ cd my_cpp_environ
Create a conanfile.txt file:
[requires]
nasm/2.13.02
# You can add more tools here

[generators]
virtualrunenv
Install them. Here it doesn’t matter if you use only the
hostprofile or thebuildone too because the environment that is going to be populated includes only the root of the graph and its dependencies, without any build requirement. In any case, theprofile:hostneeded is the one corresponding to the Windows machine where we are running these tests.$ conan install . --profile:host=windows [--profile:build=windows]
Activate the virtual environment in your shell:
$ activate_run
(my_cpp_environ)$
Check that the tools are in the path:
(my_cpp_environ)$ nasm --version

> NASM version 2.13.02 compiled on Dec 18 2019
You can deactivate the virtual environment with the deactivate.bat script
(my_cpp_environ)$ deactivate_run