Getting started
Let’s start with an example using one of the most popular C++ libraries: POCO. For convenience purposes we’ll use CMake. Keep in mind that Conan works with any build system and does not depend on CMake.
A Timer using POCO libraries
First, let’s create a folder for our project:
$ mkdir mytimer
$ cd mytimer
Note
If your code is in a GitHub repository you can simply clone the project, instead of creating this folder, using the following command:
$ git clone https://github.com/memsharded/example-poco-timer.git mytimer
Next, create the following source files inside this folder:
 // $Id: //poco/1.4/Foundation/samples/Timer/src/Timer.cpp#1 $
 // This sample demonstrates the Timer and Stopwatch classes.
 // Copyright (c) 2004-2006, Applied Informatics Software Engineering GmbH.
 // and Contributors.
 // SPDX-License-Identifier:    BSL-1.0

 #include "Poco/Timer.h"
 #include "Poco/Thread.h"
 #include "Poco/Stopwatch.h"
 #include <iostream>

 using Poco::Timer;
 using Poco::TimerCallback;
 using Poco::Thread;
 using Poco::Stopwatch;

 class TimerExample{
 public:
     TimerExample(){ _sw.start();}

     void onTimer(Timer& timer){
         std::cout << "Callback called after " << _sw.elapsed()/1000 << " milliseconds." << std::endl;
     }
 private:
     Stopwatch _sw;
 };

 int main(int argc, char** argv){
     TimerExample example;
     Timer timer(250, 500);
     timer.start(TimerCallback<TimerExample>(example, &TimerExample::onTimer));

     Thread::sleep(5000);
     timer.stop();
     return 0;
 }
Now create a conanfile.txt inside this folder with the following content:
 [requires]
 Poco/1.9.0@pocoproject/stable

 [generators]
 cmake
In this example we will use CMake to build the project, which is why the cmake generator is specified. This generator will create a
conanbuildinfo.cmake file that defines CMake variables as include paths and library names, that can be used in our build.
Note
If you are not a CMake user, change the [generators] section of your conanfile.txt to gcc or a more generic one txt to
handle requirements with any build system. Learn more in Using packages.
Just include the generated file and use these variables inside our CMakeLists.txt:
 project(FoundationTimer)
 cmake_minimum_required(VERSION 2.8.12)
 add_definitions("-std=c++11")

 include(${CMAKE_BINARY_DIR}/conanbuildinfo.cmake)
 conan_basic_setup()

 add_executable(timer timer.cpp)
 target_link_libraries(timer ${CONAN_LIBS})
Installing dependencies
If you have a terminal with light colors, like the default gnome terminal in Ubuntu, set CONAN_COLOR_DARK=1 to have a better contrast.
Then create a build folder, for temporary build files, and install the requirements (pointing to the parent directory, as it is where the
conanfile.txt is):
$ mkdir build && cd build
$ conan install ..
This conan install command will download the binary package required for your configuration (detected the first time that you ran the command), together with other (transitively required by Poco) libraries, like OpenSSL and Zlib. It will also create the conanbuildinfo.cmake file in the current directory, in which you can see the cmake defined variables, and a conaninfo.txt where information about settings, requirements and options is saved.
It is very important to understand the installation process. When conan install command is issued, it will use some settings,
specified on the command line or taken from the defaults in <userhome>/.conan/profiles/default file.
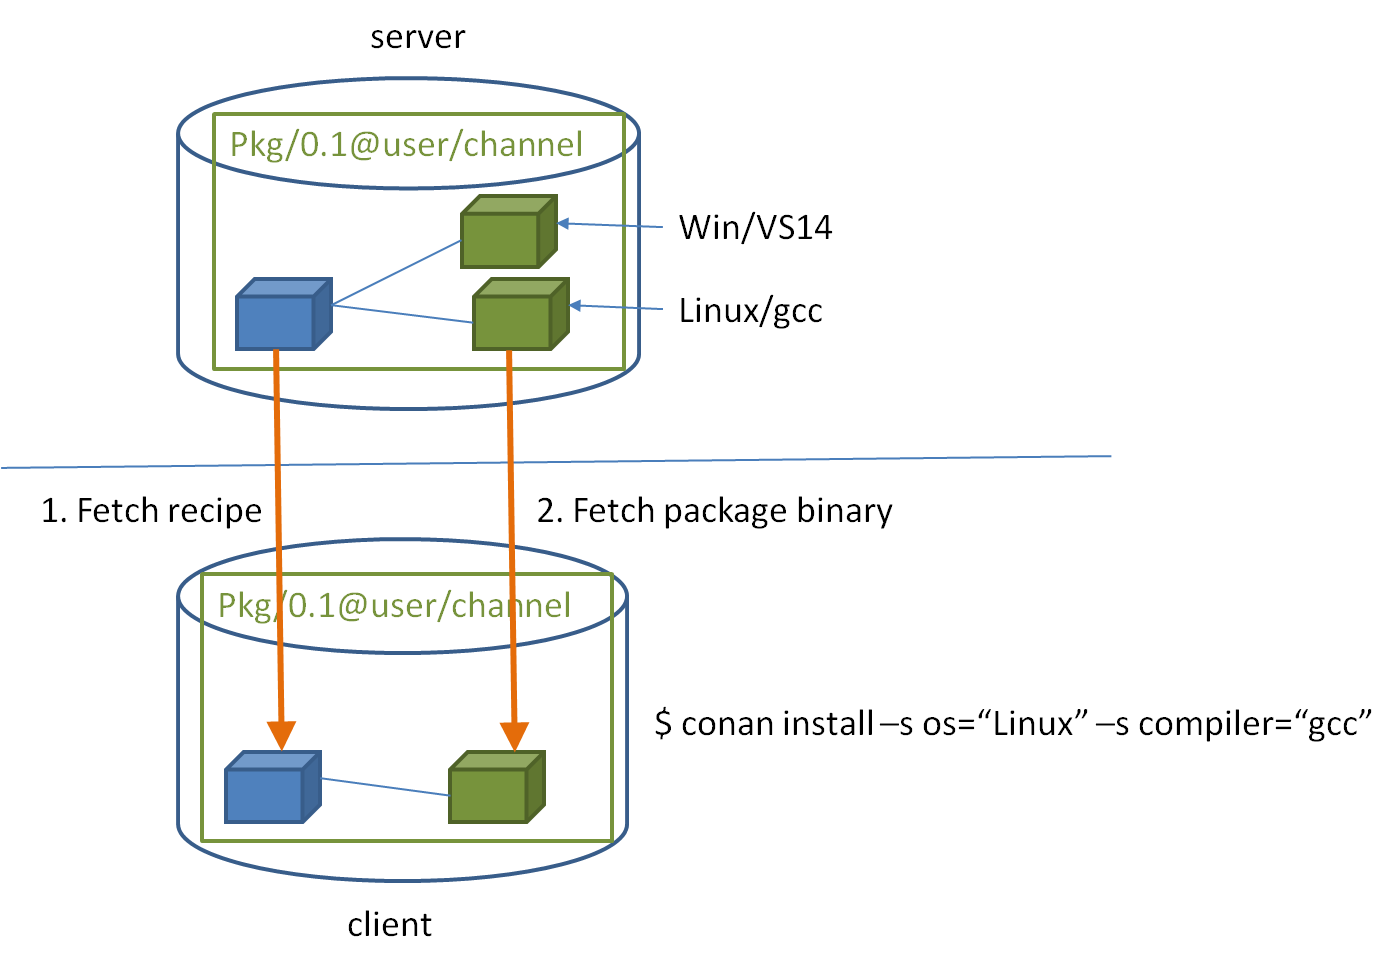
For a command like conan install . -s os="Linux" -s compiler="gcc", the steps are:
Check if the package recipe (for
Poco/1.9.0@pocoproject/stablepackage) exists in the local cache. If we are just starting, the cache will be empty.Look for the package recipe in the defined remotes. Conan comes with conan-center Bintray remote by default (you can change that).
If the recipe exists, Conan client will fetch and store it in your local cache.
With the package recipe and the input settings (Linux, gcc), Conan client will check in the local cache if the corresponding binary is there, if we are installing for the first time, it won’t.
Conan client will search for the corresponding binary package in the remote, if it exists, it will be fetched.
Conan client will then finish generating the requested files specified in
generators.
If the binary package necessary for some given settings doesn’t exist, Conan client will throw an error. It is possible to try to build the
binary package from sources with the --build=missing command line argument to install. A detailed description of how a binary package is
built from sources will be given in a later section.
Warning
In the Bintray repositories there are binaries for several mainstream compilers and versions, such as Visual Studio 12, 14, linux-gcc
4.9 and apple-clang 3.5. If you are using another setup, the command might fail because of the missing package. You could try to change
your settings or build the package from source, using the --build=missing option, instead of retrieving the binaries. Such a build
might not have been tested and eventually fail.
Building the timer example
Now you are ready to build and run your project:
(win)
$ cmake .. -G "Visual Studio 14 Win64"
$ cmake --build . --config Release

(linux, mac)
$ cmake .. -G "Unix Makefiles" -DCMAKE_BUILD_TYPE=Release
$ cmake --build .
...
[100%] Built target timer
$ ./bin/timer
Callback called after 250 milliseconds.
...
Inspecting dependencies
The retrieved packages are installed to your local user cache (typically .conan/data), and can be reused from there in other projects.
This allows to clean your current project and keep working even without network connection. Search packages in the local cache using:
$ conan search
Inspect binary package details (for different installed binaries for a given package recipe) using:
$ conan search Poco/1.9.0@pocoproject/stable
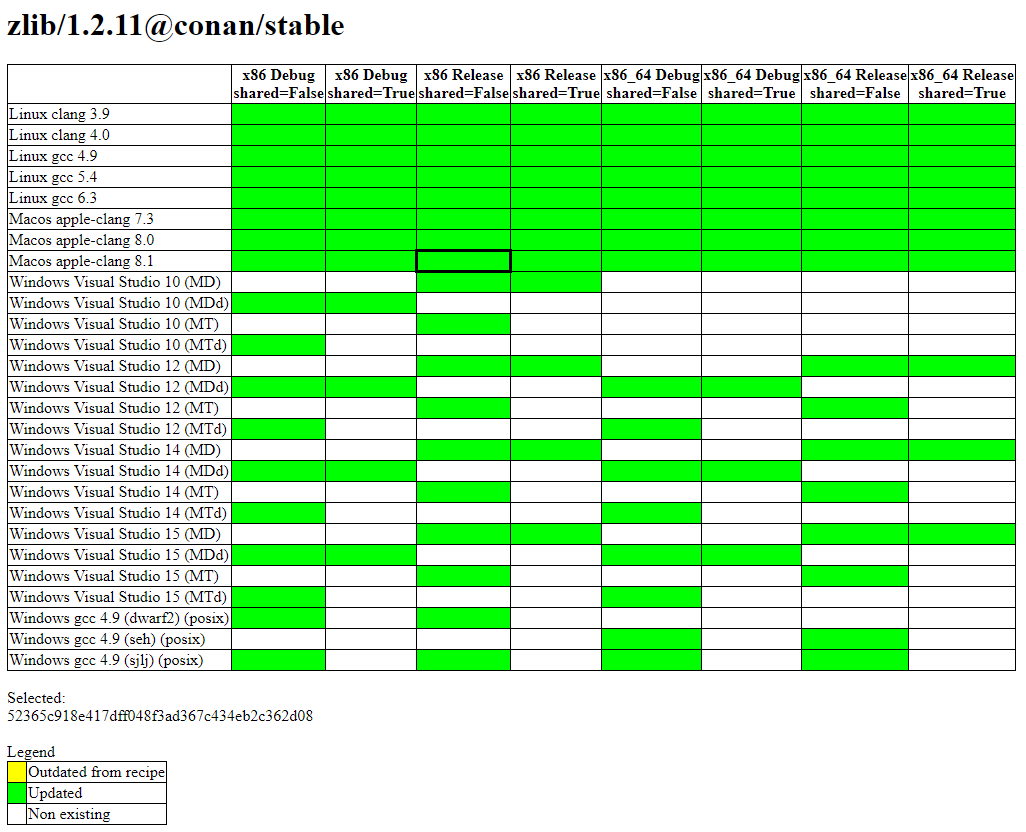
There is also the option to generate a table for all binaries from a given recipe with the --table option, even in remotes:
$ conan search zlib/1.2.11@conan/stable --table=file.html -r=conan-center
$ file.html # or open the file, double-click
Check the reference for more information on how to search in remotes, how to remove or clean packages from the local cache, and how to define custom cache directory per user or per project.
Inspect your current project’s dependencies with the info command, pointing it to the folder where the conanfile.txt is:
$ conan info ..
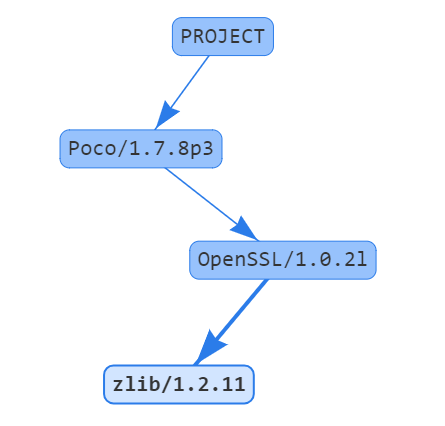
Generate a graph of your dependencies in dot or html formats:
$ conan info .. --graph=file.html
$ file.html # or open the file, double-click
Searching packages
The packages that have been used are installed from the remote repository that is configured by default in the conan client, which is called “conan-center” and is in Bintray. You can search for existing packages there with:
$ conan search "zlib*" -r=conan-center
There are other community repositories that can be configured and used, check them in this section about remotes.
Building with other configurations
In this example we have built our project using the default configuration detected by conan, this configuration is known as the default profile.
The first time you run the command that requires a profile, such as conan install, your settings are detected (compiler,
architecture…) automatically and stored as default in a profile. You can change your those
settings by editing ~/.conan/profiles/default or create new profiles with the desired
configuration.
Attention
It is strongly recommended to review the generated default profile and adjust the settings to describe accurately your system.
When a GCC compiler >= 5.1 is detected, the setting modeling the c++ standard library:
compiler.libcxxwill be set tolibstdc++that represent the old ABI compatibility for better compatibility. Your compiler default is likely the new ABI so you might want to change it tolibstdc++11to use the new ABI compliant with CXX11 directives. Read more here.
For example, if we have a profile with a gcc configutarion for 32 bits in a profile called gcc_x86, we could issue the install command
like this:
$ conan install . -pr gcc_x86
Tip
Using profiles is strongly recommended. Learn more about them here.
However, the user can always override the default profile settings in install command with the -s parameter. As an exercise, try
building your timer project with a different configuration. For example, you could try building the 32 bits version:
$ conan install . -s arch=x86
This will install a different package, using the -s arch=x86 setting, instead of the default used previously, that in most cases will be
x86_64.
To use the 32 bits binaries you will also have to change your project build:
In Windows, change the CMake invocation accordingly to
Visual Studio 14.In Linux, you have to add the
-m32flag to yourCMakeLists.txtwithSET(CMAKE_CXX_FLAGS "${CMAKE_CXX_FLAGS} -m32"), and the same toCMAKE_C_FLAGS, CMAKE_SHARED_LINK_FLAGS and CMAKE_EXE_LINKER_FLAGS. This can also be done more easily, automatically with Conan, as we’ll see later. - In Mac, you need to add the definition-DCMAKE_OSX_ARCHITECTURES=i386.
Got any doubts? Check out our FAQ section or write us.